Showing posts with label furniture. Show all posts

Monday, June 27, 2011

Reveal Monday: Coffee Table

A while ago I told you about my "new" coffee table  and how I stained the top and began painting the bottom. Just to refresh your memory, here is the during (two old coffee tables pieced together)
AND the after...
Oh. Hi Soph.
Lets ignore the fact that while I was priming the shelves from our hutch, I got a little primer on the top's edge. Shhhh. Any suggestions on how to get primer off of stain? I know, don't paint on your stained coffee table top. I have had this foolproof method of covering the table top with a cut open trash bag, it fits perfectly kinda well. I will probably still use that method but I will be more careful. 
Because I am not having as much time to do projects as I have in the past few months, I am going to be posting reveals of projects only on Mondays. And hopefully, every Monday. I even have a few forgotten projects that I will try to sneak in. 
Is anyone else really bad about getting true before shots of projects? I could have sworn I took one of my hutch, but I can not find it anywhere. Booo. Oh well, I will be sure to take an "in progress" shot. Maybe. It's so ugly, it may not deserve a before. We will see. 
Here are some more living room shots with the new table...


Link Parties:
Mod Mix Monday


Transformation Thursday

Funky Junk's Saturday Nite Special

Wednesday, June 1, 2011

Progress Week Days 2-4

Let's be honest, 3 of those days were Memorial Day Weekend and I didn't do much but walk and go to BBQs. Oh yes, I did stain my coffee table top (from my pieced together coffee table) It stinks. I almost cried. I used Minwax Bombay Mahogany and it came out bright red. My mom talked me off the ledge (over the phone) and I decided I would try another coat. Worst case scenario I would sand it and paint it. So after two coats it still looked like it belonged in a room with a duck wallpaper border (not that there is anything wrong with duck wallpaper borders, just not for us.)
Bright. Red. Horrid. This picture was taken after I had sanded it a bit (hence the light spots.) I had used the polyshades 1-step stain for the first two coats. As a first time stainer I thought it would be easier. I didn't love it, it was sort of gunky. So for coat #3, I went with a different color (dark walnut) and used the plain ole Minwax wood finish stain. The picture doesn't show much difference, but here it is...
I think I like it more? One more coat and I will know! Otherwise it's getting painted white like it's base.
Before 
Primed
I'd also like to give a special shout out to Sophia, who is now having a growling dream next to me, but spent the day "helping" me. 
Thanks Soph.

Wednesday, May 11, 2011

Daybed Love Seat

I have just finished my 3D design course at school. For our final project, we had to create a chair from found materials and it had to be life sized. Since this is my second time around with the whole school thing, I have learned not to make projects that I can't do anything with, if I can help it! So, I decided the newly built chair would be for Sophia. DUH!
So I took the day Saturday to drive around to find a discarded something to make a chair out of. He said we could start from a chair, as long as we altered it. I ended up finding this bed at EcoBuilding Bargains for pretty cheap. It came with the headboard, foot board and the side rails, and was in decent shape. WOOO! I should have turned around and re-donated the side rails, because they attacked my arm in the car later that day, boooooo.
Headboard
Footboard
I brought it to my parents garage to butcher it. I needed to cut the foot board in half (and fast, my dad was out for a bit and I was afraid he would convince me my idea was not thought out yet, he would have been correct.) So I cut the foot board in half for the "arms" of the love seat with an electric jig-saw. Cut first, ask questions later.

It was not as simple as I had originally thought. The top of the "arms" hit above the square leg, I needed them to sit flush. Thankfully, my dad came home and intervened a little bit. He helped me decide where on the arm's legs I should cut. I wanted the end of the leg to be tapering in, not out. I don't know why, just did. I cut them off with a small coping saw, because it was a small cut and I felt that I had a bit more control that way.
To attach the sides to the headboard, I used the existing slots (where the rails would go into) and cut slots in the back of the sides to biscuit join them together.

We let the sides set in place overnight.

Then, we used scrap wood, cut at a 20 deg angle, and screwed to the inside front of each side and to the inside of the back legs, to screw the seat to. It made the whole structure much more "sound." We routered the front end of the plywood seat, to soften the edge. I also cut down the arm posts, they were just too tall, and sort of screamed "this seat used to be a bed." The finials on the back were loose. I started looking for new ones but didn't find any soon enough, so they are loosely placed on the posts. Maybe they will stay, maybe they will change, who knows?
The structure was done. I had not like the color/finish/floral motif on the bed to begin with, but now that it looked really bad. My dad suggested just painting over the floral layer of wood, but I couldn't do it half way. So I primed & painted my heart out. I decided to leave the top of the arms wood, I would like to stain them a bit darker. But, for deadline purposes, that will happen later. I made a little seat cover out of drop cloth, not perfect but it works! Another addition I would like to make is a layer of foam under the fabric. We angled the seat for proper lounging, so I also want to add an upholstered, angled back.

My prof was impressed with it, I was especially proud. It took me a couple days longer than I would have liked, but I am glad I took the time I did! What do you think?

Before-ish

After

Linked to:


Transformation Thursday

 Furniture Feature Fridays

My Repurposed Life

Tuesday, April 26, 2011

But it Looks So Comfy....

After a long day, I often think of how nice it would be to come home and sit on one of these...
I know it's not cute, it's scale is sooooo off, but, how can you look at that and not think "ahhhhhhh." It has cupholders and the seats recline/swallow you whole. The only thing it's missing is a wine fridge (that would obviously open from the top! I always tell my husband he is getting a man cave in our next place and it will have seats like this. He doesn't seem that enthused about it, I AM! Where else can you put these monsters and be able to enjoy them without anyone ever knowing you actually bought them??? Maybe one day I will share a picture of his swan chair...That's right, we have swans in our bedroom. I cringe at the thought of it too, but he loves that damn chair.

Monday, April 25, 2011

Floor Plan

I always find, looking at a floor plan makes it easier for me to visualize a space. I wanted to share with you a simplified floor plan of our condo (with furniture in place.) I know, we have far too much furniture, but most of it is for storage, which we desperately need. We have plans to rearrange our bedroom furniture (and possibly get rid of a dresser.)

Thursday, April 14, 2011

Oops! x2

I have had a rough week. Well, not really, just 2 projects that have not yet succeeded.
This is fail #1:
I am painting my black bedroom furniture navy. This piece is a leg of a table that is new to our bedroom so started off stained wood. I took it apart, sanded it, primed it, 2 coats of paint on almost every surface. I kept hoping the second coat would darken it up, then I was hoping it would dry darker. Neither happened. It's bright-freaking-blue. So back to the store I went, with a new color in mind, one coat later, I am happy!
These are the legs, new on the left, old on the right.

Tuesday, April 12, 2011

Holy Roller

I have heard rumors that some people have used mini 4" sponge rollers to paint rather than brushes. I have always painted furniture with brushes, I can get the paint fairly smooth, but not perfect. Now that I am on a furniture painting kick again (I think it is a nice simple way to update a room's look) I decided to try a roller. Well, then I forgot and painted a table with a sponge brush...

Tuesday, March 29, 2011

Little Table

For our wedding gift, my Grandmother brought me to her favorite auction house to choose some pieces I liked. She stayed for the auction and called me the next day. She had won two tables for us! Woohoo! So, I went to pick up my tables and only one was there, wah wah. The table that was still there had a good shape but was not nearly as cool as the missing table :( So I took the not as nice table home.
A few weeks later, the auction house called to say my pretty table had been returned! Someone had taken it by accident and was nice enough to bring it back. And the best part was it looked 1000x better. They had cleaned it all up. We took it home right away and use it as a front hall table. The poor ugly table, it stayed in my parent's garage for a few months. I brought it to our house to put our toaster on so it was off the counter. It REALLY didn't work with our overall taste. Finally I had enough and decided to paint it. We had a nice-ish weather day that I used to sand and prime it outdoors.
I got a little too excited and started to sand it before taking a 'before' shot. The top is definitely not original to the base. It had a lot of damage on it and only a light coat of stain.

Banquette Follow Up

Last week I wrote about my newest dream of banquette seating in our dining area. The only thing getting  in the way of my dream is $$$ (isn't that always the problem?) I am sure I could figure out a low cost way of achieving this look by scouring stores and websites (CraigsListEcoBuilding Bargains, goodwill, etc.) But, we already have 6 chairs for our table, so why not try and use them? So I started moving furniture around!

Before

Friday, March 25, 2011

Things That Make Me Smile

Last night I read this post from AtticMag. I have always loved banquette seating, so I was really excited they featured some well done ones. We have often recommended them to clients for multiple reasons, the main reason being space. A chair needs about 36" to be able to, comfortably back the chair up or for someone to walk behind it, while a banquette only takes up about 18". I have considered doing some type of not-built-in banquette in the corner of my eating area.
As Is (in all honesty, the table is usually pushed against the left wall)

Sunday, March 13, 2011

Things That Make Me Smile

My cousin's girlfriend, Christina Watka, is an amazing artist. She has found an outlet to not only be creative, but to make a living. She does retail installations and has recently been working with Twelve Chairs Boston . Her most recent installation has me dreaming of it at night!

Wednesday, March 9, 2011

Happy Table

I recently purchased a coffee table and matching end table off of Craig's list. The coffee table base was in less than perfect condition. 

Wednesday, February 23, 2011

Bookcase move

Have you ever moved a bookcase to a new spot in your room? It might be the WORST piece of furniture to relocate. It seems to me that I move them more than my other furniture. I married a bookworm. He loves to read and re-reads many books. I have some architecture and building books, he has the rest of our 3+ bookcases. This bookcase was a $5 find. I brought it to my parents, I was very proud and my dad said "I will have to beef up the structure, I can't believe you paid $5 for this." I asked him if the wood would cost more than $5, he said "of course" I said, "well then I got my money's worth!" It has been a great bookcase for us. I haven't decided if I will paint or re-stain it, so, 4 years later it sits in it's original state: worn. 

Sunday, February 20, 2011

Craig's List "fun"

We have been on the hunt for a new coffee table. We have a coffee table that my mom purchased at a tag sale for my sister's college house. It was $15 15 years ago. It has been used by my sister, my parents and now by us, I think it may be time to hand it off to someone else. Either that or the base donated to a new Craig's List purchase. 

Tuesday, February 8, 2011

Monday, January 31, 2011

Things I Like

I work in the home design industry. I draw blueprints to build from for additions, renos, kitchens, baths and new homes. I do not make decisions on color or furniture choices for clients. With that being said, I do appreciate good decor. I think we all have a tiny decorator inside of us, we like and dislike colors, trends, furniture, styles, etc.
I am very frugal, partly because I am from an old New England family and old New Englanders tend to be frugal, and partly because we are young and don't have a ton of money to spend on nice things! Let's not forget, where would I put more furniture in a 650 sq ft condo? A girl can dream about pretty things. I online and in-store window shop a LOT. A few things have caught my eye recently, some I love and some I question.

Loves:
Crate and Barrel Bench I love how simple and versatile it is. Ottoman, extra seating, entry bench, end of bedroom bench.

Thursday, January 13, 2011

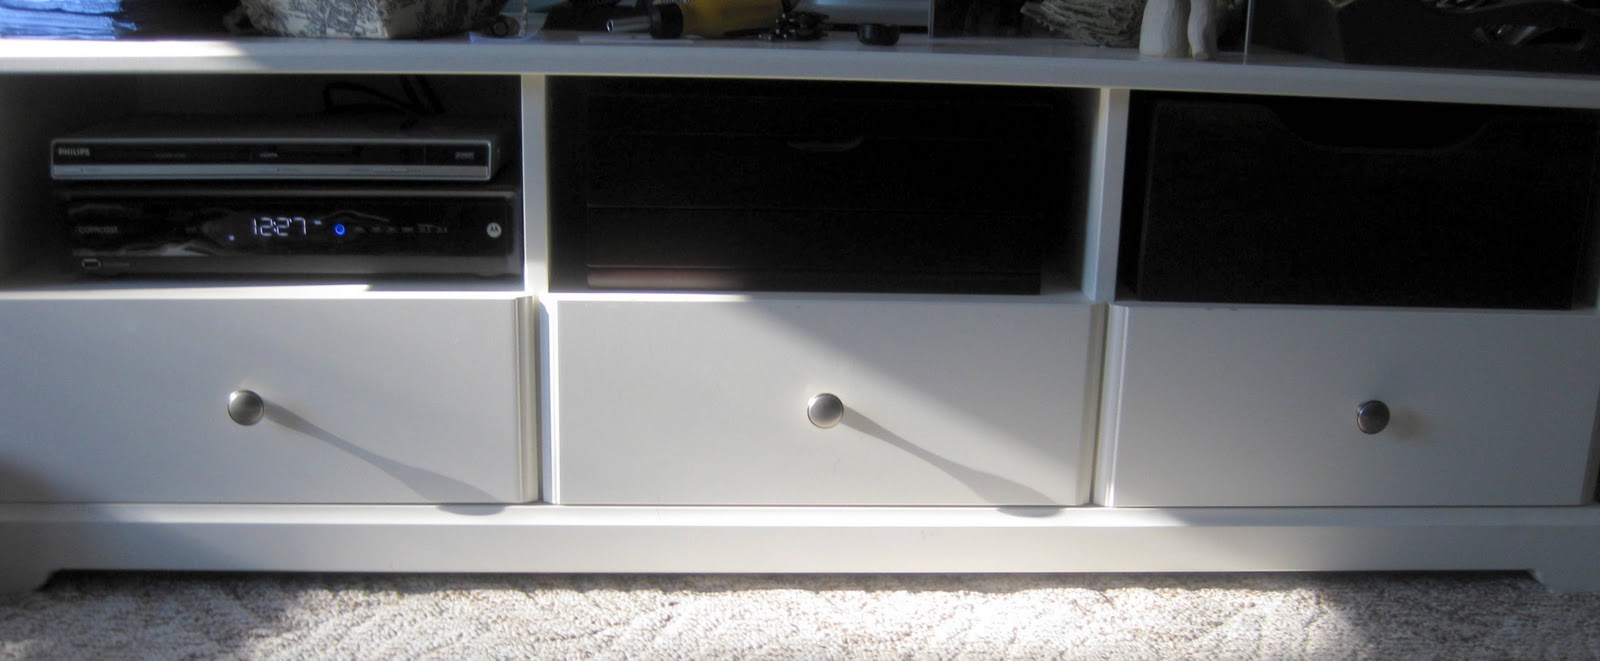
New Drawer pulls

We had a large TV hutch for the first 3+ years of living here. It was beautiful but we needed something with less mass. We had narrowed our choices down to 2. I happened to be at Ikea, on my way out I stopped in the scratch and dent room. Thank goodness I did! There was our "b" choice, all assembled with a few minor nicks. It was 50% off, plus an additional 20% off special they were running that day. Our decision was made and we had a bran new tv cabinet the next day! Our old hutch went to live at my aunt's house. She was lacking closet space in her new house and with some editing it works perfectly for tops.
My only issue with the new tv cabinet is the drawer pulls. Today I bought some at Target. I am not sold on them at the moment, what do you think?

Before

After

Wednesday, January 12, 2011

Portmerion Pt 1


For Christmas my wonderful mother gave us 10 sets of our Portmerion Botanical Garden dishes to add to our previously slow growing collection. It was a wonderfully thoughtful gift. Until we got home and reality set in: we have a 7 ft x 7ft kitchen. So my space planning abilities kicked into overdrive. The cabinet I needed to house the dishes currently had our glasses in it. So, I had to move the glasses, but where to? To a bookcase that housed DVD's in the living area of course! I unloaded the bookcase and moved it into the kitchen/dining area and loaded it with glasses. I am thrilled with the result (for today.)
Related Posts Plugin for WordPress, Blogger...